Tuesday, June 21, 2011

Quick Fix for a Breastfeeding Mama

I have been sewing maternity and breastfeeding tops! I'm just about 2 weeks away from my due date and am so ready to meet our baby girl. In between chasing the 3 year old around, I've been working on creating a breastfeeding-friendly wardrobe.

When I worked on my swim suit, I realized that swim wear construction can help make breastfeeding easier. I started with Vogue 8641. It has a loose silhouette and a drapey front.

I usually cut out my patterns with a rotary cutter. It saves me a bit of time if I don't have to use pins. I also find that it is more precise than using scissors. My pattern weights are gigantic washers from the hardware store.


This pattern is incredibly easy. Just three pieces: front, back and sleeve!


Here's a picture of the neckline assembly. I pinned the four seams and ran them through my serger.


Here's where I deviated from the directions. I used a length of 1/2" elastic on the neck instead of stitching a neck band out of fabric.

I experimented to find the best length elastic. It should be smaller than the opening you've got so it will gather up the extra fabric. I draped the elastic around my neck and took a leap of faith. Don't be scared, it's only fabric!

I quartered the elastic and the neckline and matched the pins so I could pin it to the wrong side of the fabric.


Use a nice big zig zag stitch to attach the elastic to the neck. Stretch the elastic in front and in back of your presser foot.


Here's what you get after you've sewn all the way around. At this point, you could try it on and see if you like the way the fabric is distributed. If not, it isn't too hard to rip out the stitching and try again.


Now you fold the elastic to the inside and stitch on the right side of the neckline. I used my coverstitch machine for this, but you can use a zig zag too.


Remember to pull on the elastic in front and behind the presser foot to keep the fabric flat.


Here's the elastic-ed neckline!!!


I stitched up the side and sleeve seams and hemmed the bottom and sleeves. Piece o' cake!


And, when you yank on it, you have access to all the right places! The elastic helps keep the neckline's shape so you don't look droopy when you release the neckline. That whole process is how you insert elastic into a swimsuit...whether it's the legs or straps. I prefer having a shirt that will either pull down or has a secret opening instead of pulling the shirt up. I'm looking forward to testing this shirt out!


I cut a size that is large enough to work as a maternity tunic. I figure I can either belt it or take it in when I am not shaped like a watermelon.


Here is the opening on a live model...so fancy is my lingerie!


Here are two more of the same type of shirt with the elastic neck. I'd say three is enough for now!


This is a nursing top based on Simplicity 4076.


I sewed a mini shirt to the outside of the actual shirt. The mini shirt has elastic at the bottom to hold it in place. I'm going to cut a 2-3" slit in the under-shirt, which will be hidden by the mini shirt. I've been wearing this as a maternity shirt too, so I didn't bother to put in the nursing holes yet.


Also from the same pattern, I made this sleeveless maternity/nursing shirt. I made no real changes other than adding more fabric to the belly area. This was easy to do since there is a seam down the front. Any shirts with plunging necklines work fairly well for me as nursing-wear.


See!
And, that is that! Maybe before I deliver, I can finish a few more delinquent projects...quilts I started a while ago? Here's to hope!

Thursday, February 3, 2011

First Swim Suit

Ah, black is slimming. But, can it help in a maternity swim suit? Oh yeah!

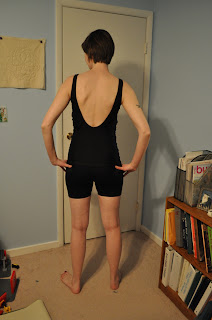
This was my first swim suit project. I'm just happy that it is wearable and it seems to fit! The pattern was great, simple directions and good pictures. Check out the pattern picture here. The pattern is for a one piece suit. I felt that two pieces would suit a pregnant body better. I added about 3" to the length of the body plus a little extra in the front and center. I made a size M and added just a little extra (maybe 1") to the sides.


Here I am at 18 weeks! I have plenty of room for more belly since the due date is July. I get the feeling that we'll go to the pool often this summer.


The back on this suit is cut too low for my taste. My shoulders tend to roll forward, so these straps could fall off if I'm not careful about posture. I might add a little cross strap in the back if it seems too risky. Would it look strange?

For the bottoms, I used a different Kwik Sew pattern, 3636. I didn't line them, hopefully they won't show through when I get them wet.


Here's the suit on a flat surface. The front is a cut a bit low, which isn't a problem for me since I'm not busty. I still might add a bit more fabric and close it up 2 more inches. Only the front is lined, not the back. This should be fine since the fabric is black.

Thursday, January 27, 2011

Squeal! My Fabric Is Coming!

Here is the pattern I have chosen to adapt for a maternity swimsuit.

Kwik Sew 3779:


I got both pink and black fabric, plus lining, elastic, and bra cups. I think I'll make a pair of swim shorts and leave off the "underpant" bottom. I'm not sure yet how I'll work the gathers in the front to accommodate a pregnant belly. Hope that something magical will happen.

Sunday, January 23, 2011

I am still alive!

If anyone is still reading this, I am still alive! I have been neglecting my sewing machine for knitting.

Here is a cropped cardi made out of a cotton bucle yarn (Knitpicks). It is so soft. I want to wear it with a dress in the spring or summer.


This is another spring/summer top to wear with almost anything. It is cotton and acrylic, also from Knitpicks.


This is an alpaca tweed yarn. This was my reintroduction into cable knitting. I haven't done it in ages...I admit that I loved it! I chose to add a ribbon facing to the button bands and do machine buttonholes. I was a little wary of combining knitting and machine sewing, but it works really well. Many of the rtw sweaters that I have involve machine buttonholes.


This is a superwash wool. It is very soft!


Me, wearing it...I am so happy with the fit! For many years, I made awful awful sweaters. Ugly colors, weird sizes. I am starting to understand how to match the yarn and pattern. Working with the guage swatch has been a big focus of mine.


Some of you may not know, but I am pregnant! I am due July 6th. I nursed my son for 18 months, and I regret not having many breastfeeding friendly tops. My bras were ugly and my clothes were ugly. Here is a Jalie criss-cross top that is specifically for nursing. It was easy to assemble. It is worth mentioning that if you want to use it as maternity wear, you need to size up a little and use a fabric that is super stretchy. I think the pattern recommends fabric with 70% stretch. That info is not well advertised...I'm glad I picked the right fabric!


I managed to knock out this Simplicity dress this weekend! It is also for maternity wear. I made no alterations for pregnancy so I could wear it afterward. I don't mind if the front creeps upward.

The gray leggings are a Kwik Sew pattern. It is so easy that you could do it with your eyes closed! Instead of using elastic in the waistband, I made it into a yoga-pant type that can be rolled up or down depending on the belly size. I think I need some in black.


I tend to be a little boring with my outfits...I need to try new things and learn about how and what goes together. So, do these leggings go with this outfit, or are they weird?

Sunday, July 25, 2010

Trousers

I know it has been ages since I posted last. We went on vacation and after that, I lost my desire to sew. I have been knitting and completed a short sleeved cardi that I'll post pictures about later. I'd like to talk about my pants. I hired a friend of mine to draft a trouser pattern for me. Here are the muslins from the trousers.

I am very pleased with the way the back fits. They are way better than any commercial pattern I have ever found. Good job, Sue!


Not so happy with the front here. I think it is very possible it was a different time of day or month when Sue measured me at first, so I am shaped a little differently. I'd prefer a lower waist, and I would like the pants to fit closer on the upper leg and then start flaring at the knee. I learned when I was measured that much of my leg length is in my lower leg. This is good to know when I am altering the big 4 patterns. I don't think I have enough space to accommodate my full front thigh. (I like to think of it as muscle! hee hee)


From the trouser foundation, I drafted a 'slack foundation.' It has a higher crotch and fits tighter in general. These pictures are without any alterations.


I added to both the front and back crotch extensions (this gave me more front thigh room) and raised the front crotch slightly, since I have a high front crotch and a low seat. I changed the leg so that it flares from the knee. I chose a fluid black fabric for my trial garment.

I feel like my alterations went really well! These are the best fitting pants that I have ever generated. The fabric is scratchy, so I'll need to line them. Next, I need to draft a waistband and figure out what style of pocket.


There are a few wrinkles because this fabric has a little more give to it than the muslin, so I'll fix that by taking the darts and seams in. I'll probably only make one pair of pants with this pattern so I can check to be sure that the fit is wearable and comfortable!


This is the first time I have been careful enough to draft and trace an entirely new pattern with each iteration of the pants. With the muslins, I marked the center front, back, hip, crotch, and knee lines. I also marked the seam lines. I had never done this before and found that it helped tremendously. I am on my way!!!! Thanks, Sue!

Edited to add more pics of the crotch curve.

This is the slack draft that I cut the black pants out of. The fold was my way of preserving the original waistline. I wanted to cut them lower, so I folded the top part down.


Here is the original draft for the trouser foundation.

Sunday, May 9, 2010

Simplicity 2647

I went to visit A Fabric Place in Baltimore a few weeks ago with my mom. They have some gorgeous fabrics. I bought a silk and linen blend, some tropical weight wool, a few knits, and this lovely silky poly that I made into a maxi sundress.


Sorry the picture is so bad, I was taking them with my tripod. I don't have the kinks ironed out of it yet! This dress is great. It is very comfortable, as you would expect with a knit dress. I chose it because I don't have anything in my closet that looks like it. I also thought the draping on the bodice would be flattering...ya know, since I have no chest?!?

I had to take in the sides of the bodice 1" each side. I also had to take up the straps 2" to get a more secure fit. If I had known, I would have added bra cups. Now I need to shop for a strapless bra to go with the dress. That's ok since I have a few other dresses that need one too.


The instructions don't allow for a nice, neat finish on the inside. Here is what the seam between the bodice and the skirt looked like before I bound them.


There was rough elastic touching my skin, so I bound it with a spare scrap of the knit that I had left over.

I would love to make this again! I'd probably do it in a little shorter length, but I do like this one the way it is!

Now, I know I told you that I'd post about the Pants of Doom....that will have to wait until next time. Just building suspense...hee hee.

Sunday, May 2, 2010

Simplicty 2977

I really have been sewing lately. I am very very behind with what I have been upto in my little room here. A few weeks ago, I spent a few very pleasurable hours making up this dress from Simplicity 2977.
I wasn't sure that the cut of the dress would suit my very pear-shaped figure. I was right! Since I am tall, I made a belt to cut my figure in half. This seemed to help the overall impression of the dress' silhouette. You can see from the back view that it would be a lot of fabric without a break...hence the belt. I am pleased with the fabric...it came from fabric.com, where I buy entirely too much fabric as it is. I think it is a rayon poly blend. It is very drapey and swirly, great for this dress. I am considering making another version of this dress in a reddish or black and white colorway.


Up next...the pants that tried to kill me!